It's time to decorate that house!
| Gingerbread Dough | Construction | Back to Home | My Cookie Page | Recipe Circus |
TODAY!!! It's now time to talk about decorating your house. My advise is to have your house put together and ready to go, then and only then go out and purchase the candies and other decorations you plan on using to finish your project.
If you can't think of any ideas to decorate, check out some books, or better yet, surf around the internet for people who have posted photos of their own projects. I kept my demo house simple, so anyone could easily complete their own house.
Here are some links to other pages I have found, simply type in "gingerbread" into your favorite search engine and sift through what pops up, you will be amazed at what you can find!
- Annie's Gingerbread Homepage
- Lot's of gingerbread links and other related information! Go Annie!
- Gingerbread Lane
- Tips and hints as well as candy ideas for your house.
- Franky's Attic
- Links, information, patterns, plus PHOTOS!
When you are ready to finish your house, assemble a batch of icing (covered with a damp cloth!), a piping bag with a small-ish tip to help you "squirt" the icing exactly where you need it, and your gathering of candies and decorations. I personally like tip #4 or #5 because it is larger and doesn't clog as easily, and yet, if you press your bag hard, the icing will really come out.

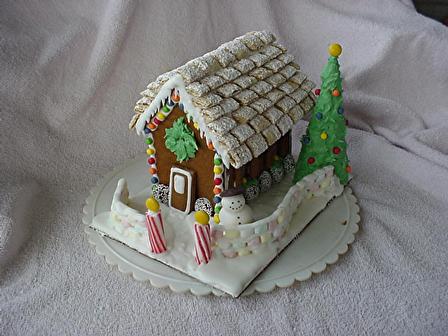
First, spread a thin layer of icing onto the surface of your board. Decide where you want to place the house and pipe a bead of icing onto the bottom walls, place your house. Decorating is quite subjective, so use your imagination! Below are the steps in decorating my demonstration house. Working on a turntable is wonderful so that you can turn the house without disturbing it. If you don't have a turntable, even the simple flat one from Wilton will work, place the board onto another board so you can spin the house on your work surface.

I have chosen easy to find, recognizable candies for my demo house. I used the little chocolate wafers with the white "non-pareils" embedded in one side for the bottom of the house, pipe a small bead of icing on the back and press into place.

The shutters are added with a thin bead of icing.

For the front, I found "Willy Wonka's Tart & Tinys". They are small and come in multi colors. I purchased them because of their color and size, but I wasn't sure what I would do with them until I brought them home. Once I sat down, they immediately became a string of lights and tree decorations! If you can't find anything, mini M&M's are about the same size and colorful. I piped a bead of icing along the outside of the front of the house and evenly spaced the candies along the icing bead.

A wall is built by piping a bead of icing along the path you wish the wall to lay. Then lay down the first row of colored party mints. I alternated colors with a pattern, but you can just randomly lay them down. The second row is alternated over the space from the lower row. For the edges, simply cut a mint in half to complete the wall. I would let the two rows set for about an hour for the icing to set up before adding a third row. If you take your time and let the icing dry and harden, you could probably stack a wall about 4-5 rows high, depending on the size of your finished house. I topped off the top of the wall with a bead of icing.

For the gate/light posts I used a piece of peppermint stick topped off with a yellow M&M "light". For the door, I piped an outline in icing and then just gently pushed it in place. Mr. Snowman is simply three balls of rolled fondant in three sizes. For his hat I used a chocolate wafer. He had his face painted on with a toothpick and some black gel color.
I piped icicles by piping a larger amount of icing on the edge of the roof, then I pulled it down to create the icicle.

At the bottom of the windows, I colored some of the icing green and piped little leaves. I then pushed a small yellow candy like a light in the window.


The wreath was piped onto a piece of parchment, just with a leaf tip in a round shape, nothing fancy. When it was dry, I peeled it off the parchment and glued it in place with the icing. The tree is a parchment cone covered in green icing, then while the icing was wet I pressed the same little colored candies into the sides for lights. The "star" is another yellow M&M.

The finished house is a wonderful afternoon project for the whole family. It's small enough to hold the attention of a young child, yet not overwhelming to the novice baker. A batch of dough, one batch of icing, an afternoon baking and assembling, then enjoy sitting down and creating your wonderful little Holiday centerpiece. And better yet, it's completely edible!!
| Gingerbread Dough | Construction | Back to Home | My Cookie Page | Recipe Circus |
Page Created On November 19, 2000
Page Last Updated On February 25, 2001